GPS Considerations and Information
I had an issue with my sole GPS source last week where the android OS crashed due to the new Kitkat 4.4 update.
Shopping for new GPS for backup led me to these thoughts:
Thoughts:
1) I primarily use my android GPS app: "US Topo" from Google Play. I've had to supplement the battery life of the phone by purchasing a 12 Amp-hr battery (good for 2-3 charges).
2) a physical compass is priceless (as are paper charts if you are new to an area). The compass will not crash etc. It will save money too on getting one built into GPS (I don't think this is really worth it)
3) the availability of GPS topo maps at 1:24000 resolution FOR FREE makes the extra cost for this option built into a gps not a factor. IT SHOULD BE a determining factor between brands of GPS that may or may not be able to load external maps.
4) Regional 1:24k topo maps take up about 10 Mb of space, which means on fairly new GPS that can be loaded, you can load 1 or more regions (you don't need the entire state or country) without a problem. My old (2004) Garmin GPSMaps 76 (monochrome) had 8 Mb, so I can load SOME regions (<8 Mb). It's painfully slow to scroll, but will serve as a usable backup. What this point means is that you do not need 3 Gb of storage... or even an SD card reader built in.
5) Along with #3 and #1, I don't need a memo recorder, phone, or compass that come at a premium cost, in my GPS. my phone does these fine without cell reception. A compass on a lanyard around my neck is as vital as a pocket knife.
6) Garmin seems to be the most widely supported and longest running GPS maker. It has the broadest community support in my observations over the last few days. This adds up to forums with Q&A where you can trouble shoot or find answers already solved.
7) Garmin: It also means there are FREE maps available and for the missing maps, there are map making tools available:
This site provides free support and maps, mostly tailored to Garmin platform: http://www.gpsfiledepot.com/index.php but supposedly they can be used by other platforms (Magellan?)
8) Garmin: Garmin provides free PC software to manage your GPS. For PC's you need either basecamp or mapsource to retrieve or store waypoints, tracks, routes and maps from/to your GPS. It took some playing around, but I learned them in a day and will write a tutorial for both.
I loaded MapSource from CNET (to avoid bloatware installation, use this direct link: http://tinyurl.com/mapsourcegarmin ) for my older GPSmap 76, which Basecamp doesn't support.
For Mapsource, I downloaded the original older program from CNET, then, after installing, I downloaded the upgrade patch from Garmin: http://www8.garmin.com/support/download_details.jsp?id=209
The general page for Mac and PC GPS management software (FREE) is http://www8.garmin.com/support/mappingsw.jsp
This includes the latest version of Basecamp.
There is a free Garmin GPS manager available for modern/some Garmin GPSs called Garmin Express: http://software.garmin.com/en-US/express.html
There is also a free marine chart builder manager available here (disclaimer: I haven't used or tried it): http://www.polarnavy.com/#sthash.6IHLoGX9.dpuf
9) Garmin (primarily): to get additional maps for the Garmins (and supposedly other brands) for a fraction of the cost (or FREE) in many cases, try this site: http://www.gpsfiledepot.com/index.php
Here's the link for the Florida maps: http://www.gpsfiledepot.com/maps/state/fl
I didn't purchase any, but went with the free ones (not stealing, these are based on publicly available information. The ones who charge are doing so to compensate themselves for the production work they performed to make them available). What I can tell you is that the ones downloaded as exe files (or that unzip to exe files) will install themselves into the garmin directories that were created when you installed Mapsource and/or Basecamp (I do have both installed to learn)
If the tutorials on Mapsource or basecamp at GPSfiledepot don't help you (they didn't me), try my trial and error lessons:
* To open the newly installed maps in Mapsource, you must go to View>Switch to Product and select the newly installed map to display
* To open the newly installed maps in Basecamp, on the toolbar, select Maps and then select your new map.
10) Magellan: Here's a free management program for your PC. After looking at all the features and support (and though my original GPS back in 1999 was a magellan), I'm not looking at Magellans any further: http://www.easygps.com/gps-receivers/Magellan-eXplorist-500.asp
11) Finally, to help you with decision-making process, if you are buying a new GPS and money is a factor, consider this approach:
a) either find a site that has the models you're interested in evaluated numerically OR develop your own grid/matrix with the categories that are important to you factored in. Assign each category a point value (say, 1-10) and then score each category accordingly. Sum the scores for each model and choose the highest score.
b) alternatively, as above (step 8a), I chose a site (http://www.outdoorgearlab.com/Handheld-Gps-Reviews/Ratings ) that had evaluated a series of models including a couple i was interested in. I then inputted the data (with updated/real cost from Amazon.com ) to a spreadsheet and had the spreadsheet invert the score total for each model. I then multiplied the cost by the inverted score totals and looked at the result. By graphing product versus price, I was able to see visually the groups of GPS by prices and the lowest in each group represented the best buy for each price range:
Like Golf, lowest score on my approach wins: however, I discounted the Magellan 310 since the evaluation did not score the ability to load freely available maps:
| model | price | P*1/v | P*1/rs |
| magellan explorist 310 | 126 | 2.4230769231 | 3.7058823529 |
| gar etrex 20 | 170 | 2.9310344828 | 4.5945945946 |
| gar dakota 20 | 191 | 3.0317460317 | 4.775 |
| Garmin Oregon 600 | 352 | 4.0930232558 | 7.04 |
| gar Oregon 550 | 318 | 4.2972972973 | 7.0666666667 |
| gar gpsmap62sc | 337 | 4.1604938272 | 7.3260869565 |
| magellan explorist 710 | 369 | 5.5909090909 | 9.4615384615 |
| delorme pn60w | 350 | 6.1403508772 | 9.7222222222 |
| rand mc 850 | 399 | 7.125 | 11.4 |
this looks like this when graphed:
Views: 526
Replies to This Discussion
-
Permalink Reply by Gary M on
-
Shawn,
I'm experimenting with a different approach. Instead of my dedicated GPS ( I have Garmin) I've purchased a GPS enabled Android tablet and loaded an app called Backcountry Navigator. You may want to look into it. I wanted the tablet primarily because of the larger screen (7 inch). I have not upgraded to Kit Kat as I heard about the GPS bug.
So far I'm liking it, although there is a learning curve. The app ($10 after free look-see) supports a wide variety of download sources, both topo and satellite images. Unfortunately, the big corps: Google Earth, TerraServer, Bing, etc. got wind of people grabbing their imagery (via MOBAC) and put a stop to it. But there are lots of sources, the best (highest rez) are "premiums" that require a small subscription, but I've not had to go that route yet.
There is a lot of functionality outside the usual stuff, but its not "off the shelf". It takes a bit of want-to and some technical ability.
I'll be able to better report after I use it more, maybe by the end of the year.
Like you said, still carrying redundant magnetic compasses! Technology is great until it isn't.
-
Permalink Reply by shawn beightol on
-
My android samsung S4 active is my primary gps/map tool.
I tried Backcountry and US Topo simultaneously and went for US Topo. I found Backcountry a little bulky.
Stay away from kitkat. there is no ends to the bugs (google it)
It'd be nice if phones/tablets could implement paper white screens like kindle for sunny days.
-
-
Easy method to add topo layer to GE (use opacity slide to make it transparent to see sat imagery beneath topo overlay):
http://equipped.outdoors.org/2012/12/how-to-add-usgs-topographic-ma...
-
-
from http://www.huntinggpsmaps.com/tutorial14-sending-tracks-waypoints-f...
- Open Google Earth. Free software from Google - Download it if you haven't already.
- Zoom to an area you are interested in Scouting or Taking some sort of Trip to.
- Create a Folder in 'My Places' to organize your data for this trip. I will create a 'Scouting' folder, then a new sub folder with this trip's date and location information - '2011 Wyoming Wapiti Basin Elk Hunt'
- As you browse around the area, mark waypoints of possible areas you may want to visit (possible campsites, lookouts, meadow openings, possible bedding areas, landmarks you may want to visit, edges of timber, etc.).
- To mark a Waypoint select the 'Add Placemark' tool from the Toolbar (The yellow Push Pin icon).
- The waypoint will automatically be added to the map at the center of your view. Left Click and Drag the waypoint to the place on the map where you want to add the waypoint.
- In the 'New Placemark' window that popped up on the screen, change the name of the waypoint to a meaningful name. Select the waypoint icon in this window to change the icon to a more appropriate icon. (Note: these icons will not show the same in BaseCamp or on your GPS).
- Note: If you need to move or edit a feature you create you can always right click it and select 'Properties' to get back into edit mode.
- Now let's create a Track that represents the route we plan to walk based on the terrain features we can see in the satellite image.
- Select the 'Add Path' Button in the Toolbar at the top of the screen.
- A 'New Path' window pops up - DON'T JUST PRESS THE OK BUTTON IN THIS WINDOW - YOU MUST DRAW YOUR TRACK FIRST. Move the 'New Path' Window to the side and start left clicking on the map where you want to create a track.
- Continue Left Clicking to add points along the path you want to take. Alternatively, you can hold the Left Click and drag to quickly create a line with a bunch of points.
- In the 'New Path' window that popped up on the screen, Name the path an appropriate name. Select the 'Style, Color' Tab if you want to change the appearance of the line you created. Add a description if you wish.
- Now you have tracks and waypoints to send to your GPS. We need to save our data as a .kml file. Right Click on your folder in My Places on the left side of the screen - '2011 Wyoming Wapiti Basin Elk Hunt' in our example. Select 'Save Place As' and save a .kml file to your 'My Documents' or some place that is easy for you to remember. (Note: You should be able to expand this folder and see the tracks and waypoints you added as a subset of this folder. If all the features you created aren't under this folder, you need to click and drag them to this folder.
- Open a web browser (i.e. Internet Explorer or FireFox) and google "kml to gdb web converter". Here is the one I use, though there are many that will accomplish this task.
- In the web converter I use here are the parameters I set: WAYPOINTS [W], Input file: Google Earth (Keyhole) Markup Language, Output File: Garmin MapSource - gdb, Try to output all Types of data - YES. Now Upload your GPS file: (Browse to the .kml file you just saved)
- Now select Convert the File. Save the output .gdb file to the folder location you have been using
- Open Garmin's BaseCamp software and select 'File' > 'Import' and browse to the .gdb file you just saved.
- Your Waypoints and Tracks are now imported into BaseCamp, ready to be sent to your GPS! You should see your file in 'My Collections' under 'Library' on the left side of your screen. If BaseCamp didn't automatically zoom to your data, you can left click on your file under 'My Collections' - you will now see your data in a table at the bottom of your screen. Right click on any waypoint and select 'Show on Map'.
- Your waypoint symbols you set up in Google Earth will most likely not come through in BaseCamp, so you can also edit the names and symbols of your waypoints by right clicking the feature in the table at the bottom of the screen and selecting 'Properties'.
- To send the Tracks and Waypoints to your GPS, Plug in your GPS to your computer via USB. Right click on your file in 'My Collections' under 'Library' on the Left side of your screen and select 'Send To' - then select your GPS.
Congrats! Now you're ready for the fun part - Hit the field with more Confidence!
-Eric
-
-
From http://help.routeyou.com/en/topic/view/185/track-route-conversion.en
Converting a Track to a Route (GARMIN) using BaseCamp
The Garmin Software BaseCamp allows you to convert a TRACK to a ROUTE.
Here are the steps
- Open (or install first) the program BaseCamp
- Import your track in BaseCamp (read here how)
- You imported track is listed on the left (lower half) with the two footsteps icon.
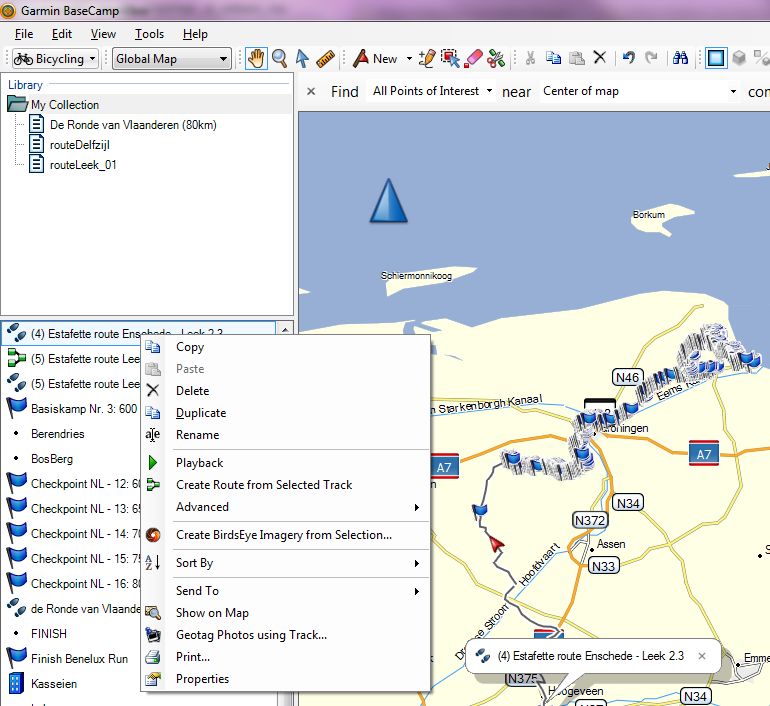
- Click with the right mouse button next to the two footsteps, on the TRACK (listed in the column on the left) to open the option menu
- Select "Create Route from Selected Track" and the conversion to a ROUTE will take place
- The ROUTE with the same name as your TRACK is now also listed on the left. Instead of the two footsteps icon you get to see 3 green connected squares representing a DIRECT ROUTE (a DIRECT ROUTE is a ROUTE which connects its viapoints with a streight line, and not a routed line. To that extend is a DIRECT ROUTE functionaly the same as a TRACK (see also FAQs below).
- To upload the ROUTE to your device from Basecamp,(read here more)
Converting a Track to a Route (GARMIN): alternative software
You can also use the program winGDB to convert a TRACK to a ROUTE. You can download the software here.
Install this program on your PC and follow the instructions.Frequently askes questions (FAQs)
Doesn't a ROUTE follow the network of the activated map?
It is correct that a ROUTE follows the network of the activated map on your device. That's the difference with a TRACK (read more about it here).
But a DIRECT ROUTE (or a route with the routing option DIRECT) in Garmin is a route with straight lines between the via-points. From a FORMAT point of view, the ROUTE is a ROUTE, but from a functional point of view, the ROUTE has no more information than a TRACK.
This is nevertheless important for some GARMIN devices because some GARMIN devices can only import ROUTES (from a FORMAT point of view), a,d no TRACKs (e.g. [help=184]the Zumo 210[/184]).
About
Welcome to
Everglades Exploration Network
© 2025 Created by Keith W.
Powered by
![]()